iCreateOFX PayPal API to OFX
Convert PayPal transactions to OFX, QBO and QIF files via API.
- Convert PayPal Premier transactions to OFX and QBO.
- Convert PayPal Business transactions to OFX and QBO.
- Convert PayPal Premier and Business transactions to QIF.
- Archive downloaded transactions.
The interface consists of six (7) main areas.
-
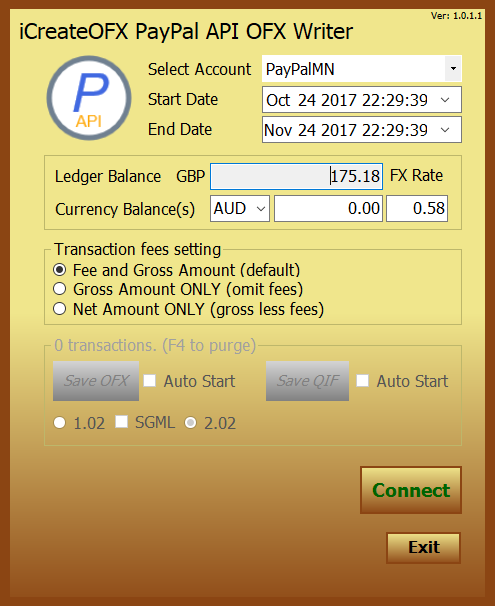
The Account: This is the PayPal account you wish to download transactions for. You can have multiple accounts setup via the Account Settings dialog.
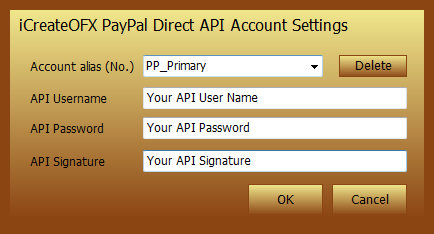
- Account Alias: Select an alias to associate with the account. The alias will be used as the account number in the resultant OFX and QIF files.
- API User-name, Password and Signature: Obtain these values from your PayPal Premier and / or business account. For instructions on how to obtain these details see our API Guide. (Not available for personal accounts)
- Start and End Dates: Select the timespan for which you want to download transactions for. By default, the start date will be set to 30 days from the date when the program is started. All transactions will be automatically archived for that date range, however, if the same date range is selected again, all transactions available at PayPal will be re-downloaded.
-
The Balances:
- The Ledger Balance: This represents the total balance in the PayPal account's primary currency.
- Currency Balances: If you hold multiple currencies in your PayPal account, these will be listed here in addition to the PayPal FX rate to your primary balance. NOTE: The FX rates are as supplied by PayPal, however, they are merely an estimation of the balance transfer rate and lack precision. You can adjust the rates if your ledger balance is not accurate.
- Transaction fees setting: Select an option from here to determine the treatment of PayPal fee(s) in the OFX and QIF file. the first option will include the fee(s) as a separate transaction, the second option will NOT include any fee(s), while the last option will deduct the fees from the transaction amount.
-
Save to OFX, QBO and QIF: This is the area to save your files from. If your computer has a file association to either file format, then selecting the Auto Start option next to the
respective button before saving will invoke the associated program once the file has been written. If the Auto Start option is not enabled, then the program could not find any associated program to
the respective file type.
-
Save OFX and Save QBO: Before you save to OFX files, you can select which OFX version to write the file (that your PFM supports). As a general guide, older
PFM's and some with loosely implemented parsers support version 1.02, while others only SGML type OFX of version 1.02 (e.g SplashMoney). The program defaults to version 2.02.
NOTE: In order to save to QBO, press the F3 button. Press again to toggle back to saving to OFX.
NOTE: Though the program supports saving the OFX file with a QBO extension, we can not offer support if your PFM fails to correctly import it. - Save QIF no versioning is available for QIF format, simply save to desired file name when prompted.
-
Save OFX and Save QBO: Before you save to OFX files, you can select which OFX version to write the file (that your PFM supports). As a general guide, older
PFM's and some with loosely implemented parsers support version 1.02, while others only SGML type OFX of version 1.02 (e.g SplashMoney). The program defaults to version 2.02.
- Connect: This will connect to PayPal to retrieve the transactions between the date ranges set in the start and end date(s).
- Exit: Closing / exiting the program.